Wouldn’t it be nice if you could copy some YouTube videos onto your hard drive? If you could then you wouldn’t have to re-stream them every time you want to watch them, and you would be able to watch them offline, transfer them to other devices, and much more.
Of course, as you know there is no ‘save’, ‘download’ or option to ‘copy’ videos from YouTube. As such if you want to do so you’re going to have to be creative, and one way to do that is to use Movavi Screen Recorder and record the video from your computer screen.
Unlike what you may have experienced in the past, Movavi Screen Recorder is easy to use and user-friendly, and you can set it up to record YouTube videos in minutes. If you want to try it out now just open up the YouTube video and launch the software too.
The first thing you’ll have to do immediately after the software is launched is to define the capture area. In Movavi Screen Recorder that is as simple as drawing a frame over the YouTube video with the mouse cursor, and then adjusting it until you’re satisfied it encompasses the video properly.
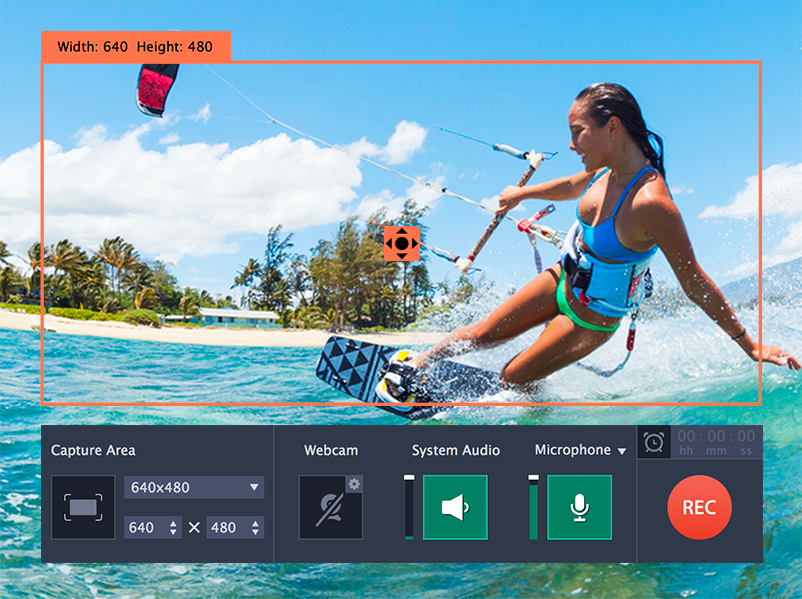
In the interface of Movavi Screen Recorder, you should see two icons that will let you enable or disable recording audio from certain sources. Ideally, the ‘System Audio’ icon should be highlighted and the ‘Microphone’ should not be, and you can click on either to toggle its status.
Before you start recording you could also alter the capture are further, set the frame rate, adjust the sound levels, or opt to record keyboard and mouse actions. If you click on the ‘alarm clock’ icon you could even choose to automate the recording, either by setting a timer to stop it after a fixed duration or by scheduling both a start and stop time.
Of course, manually controlling the recording is possible too by clicking ‘REC’ then using the other buttons on the interface. When you click ‘Stop’ Movavi Screen Recorder will save the video automatically as an MKV video and let you preview the video that you recorded and make sure it looks good. In the preview window, you can trim out any unwanted parts too –
such as footage that may have been accidentally recorded at the start or end of the video. If you make any changes or just want to save it in a different format, click ‘Save As’.
That is all you need to know about how to copy a YouTube video and save it on your hard drive. As you can see it is really simple, intuitive, and straightforward and although familiarity does help you should be able to get started in no time. If you ever want to be able to record, save, and copy YouTube videos or any other online streaming videos – trying out Movavi Screen Recorder is definitely a good place for you to start.


